fbpx

How to Set Up Your Namecheap Domain on Bluehost WordPress Hosting

Overview

So you’re looking to create a blog? Perhaps you just want to just want a website with a professional looking domain? Either way, i’ll show you how to get set up with your own web hosting and domain.

Setting up a self-hosted website is easier than you think.

15 minutes is all it took me earlier today to complete the process outlined below. Surely you can spare that time to get your own website setup?

Today i’ll show you how to get a domain and then point the nameservers to your web hosting service.

How To Get Your Own Domain Name

Step one in getting your self-hosted website is to register your own domain name. I use, and can recommend, Namecheap for your domains.

The first step is simply to head to Namecheap.com and find the domain you want.

I recommend going for a .com domain mainly for SEO reasons, but it also provides a professional appearance. You can read more here.

Once you have selected your domain name, head to the Shopping cart page. Here you can use a free Chrome Extension called Honey which automatically applies discount codes for you. This will help you get the lowest price possible on your domain from Namecheap.

WhoisGuard is a free privay feature that hides your personal information when people look up information for your domain name from Namecheap. Make sure you enable this free feature.

Before you confirm your order, head to TopCashback (or any other cashback site). Search for Namecheap and then checkout as normal. This will allow you to get free money back on your order, discounting the cost of your new domain even further!

Confirm your order and complete the checkout procedure. 

Congratulations, you’re now the owner of your new domain name!

How To Get Your Web Hosting

Now that you have your own domain name, it’s time to find a service to host your website.

I use Bluehost to host all of my websites. There are a wide range of packages available to suit all needs. When starting out, shared hosting will be your best bet. It is far cheaper than dedicated hosting, and has all that you need. 

To start with, I recommend the “Basic” package. Bluehost’s support team is awesome and you can very easily upgrade your plan as and when you need to. 

There are a lot of options to choose from here including WordPress hosting, shared hosting and dedicated hosting. WordPress is a content management system which many websites run on. I use WordPress to build my sites and it has awesome capabilities. Don’t get overwhelmed by all these options. Unless you know you need a specific plan, I recommend going for the Basic shared hosting plan at Bluehost.

How To Point Your Nameservers To Bluehost

Congratulations, you’re almost there. You have registered a domain at Namecheap, and signed up for web hosting with Bluehost. Now you just need to point your nameservers to Bluehost (it’s very easy).

Head over to Namecheap again and login. On your dashboard, click the “manage” button next to the domain you wish to point to Bluehost

On this page, scroll down to the “nameservers” section and select “Custom DNS” from the drop-down menu. Enter the following in the “Nameserver 1” and “Nameserver 2” fields:

Nameserver1: ns1.bluehost.com

Nameserver2: ns2.bluehost.com

Once you have done this, remember to click the green tick icon to the right of the page, as shown below.

Now, head back over to Bluehost and login. This will take you to your control panel. From here, click on “Domains” from the menu on the left.

On the “Domains” page, click on “Assign a domain to your cPanel account”.

You will now have 4 steps to follow.

Step1: Select the second option “Use a domain that is not already associated with your account.” and enter the domain that you have just purchased from Namecheap, without “www.” at the start. for example, I entered “lukefiler.com”.

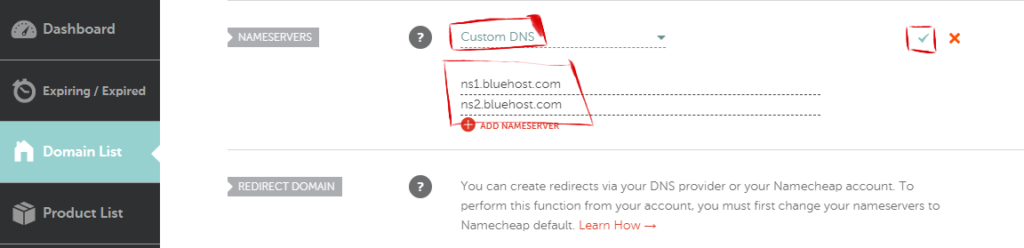
Step 2: This verification is done automatically as you have already pointed the nameservers to Bluehost.

Step 3: Click the “Addon Domain” option

Step 4: Select “Create a new directory” and enter something into the sub-domain field.

Finally, hit that “assign this domain” button. Congratulations, you’re good to go. Why not visit your new website now…?

I hope this guide on how to set up your Namecheap domain on Bluehost WordPress hosting has helped!

If you have any questions, comment them below or ask them in the active Facebook group.